This pouch is based on this website.

Leather drawstring pouch (unlined), with finger-loop braided drawstrings and tablet woven seams.
Pouch is made of scrap leather which I believe is deerskin, and cotton thread (because it was my first time finger-loop braiding in 10 years and the first time tablet weaving edges EVER! YAY, NEW STUFFS!)

Isn't my clamp loom awesome? Not period, but oh so cool and handy! The two halves of each post are lined with those felt stick-ons you put on the bottoms of furniture to keep them from scratching the floor. The removable half has screws attached that go through holes on the other half and screw in as tight as they need to be.
In the above picture, the ends on my tablet warps are loops, so I just stuck a stick through the loops to keep them from pulling through the clamp. The blue thread seen hanging is the weft (on a needle, to sew through the leather). The bit of red at the start of the tablet weaving is my lead thread. I do a full set of 4-5 picks (a pass of the weft through the warp one way) to draw in the warps and space them evenly before starting with my actual weft, the tail of which is woven in as I start weaving.
I used six cards, alternating S- and Z-threaded, two each green and blue thread, staggering colours by one hole across the cards.

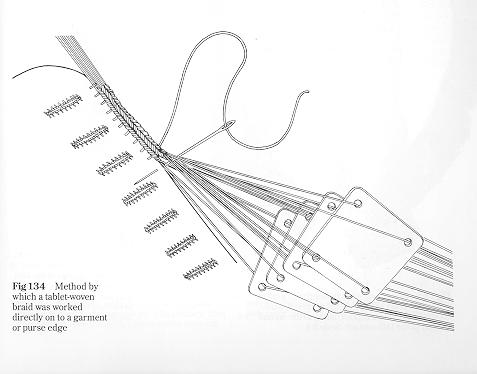
There's two ways to do a tablet woven edge, depending on the look you want and the purpose of the edge. In this case the tablet weaving is woven like a tube around the edges of the leather. You can find a different way of doing it here, which will produce a flat band that is attached at one edge to the edge of the fabric.
Pass the weft thread through the warp towards you, then sew through the leather edges away from you; turn the cards a quarter turn and pass the weft through the warp, and leather again. Essentially the weft thread is spiralling through the weaving and the leather.
I didn't make the holes in the leather first with an awl, because I wasn't sure how close the weft threads would pass, and whether I needed to sew through the leather each time, every other time, or whether I'd need to stitch twice every time I passed the weft through the warp. Determining this is mostly a matter of how thick the warp threads are. In my case, it turned out to be a stitch every time the weft passed through the warp.

The tablet woven edges were done with a continuous quarter turn forward. I chose to continue the weaving on to make the hanging strap rather than edge the opening with the weaving. There's some question as to whether this was done, but since leather edges don't fray and I didn't line the pouch, I decided I'd rather make a strongly attached strap than put unnecessary edges on the top of the pouch.
If you are going to do this, continue weaving a tubular or flat tablet woven band once you finish the first side of the pouch, for at least half the length or a little more that you want the hanging strap. (I chose to do a flat band and switch to a pattern of eight quarter-turns forward, eight quarter turns back.) Then shift your weaving forward on the loom so you can bring around the pouch and weave the other edge. (see picture below)

If you'd rather sew edges to the opening, or have to because your pouch is lined and/or made of cloth, there's a couple ways to do this. If you are going to sew all the way around the pouch, including the bottom, you can start at one side of the opening and go across the top, down one side, around the bottom, up the other side and across the other side of the opening.
A more likely way of doing it (many of these pouches do not have a bottom seam and do not have tablet weaving along the bottom) is to start from a bottom corner, and when you reach the top of the pouch add in a second weft, and at the turning of the top corner split the deck of tablets in half. Do each side of the opening with one of the wefts and half the cards, then put the deck back together and remove one weft as you turn back down the other side. Most of the medieval pouches were done this way, including, I believe, the leather ones.
Either way you do this, the warp threads will want to go straight and the collective edges of the pouch aren't a straight line. You will need to turn the pouch, but maintain a straight line from the starting corner of the side you are currently working on and the unwoven warp. There's a picture of one way to do this here.

Continue on until you are finished the other side. At this point you can either finish off the weaving and trim off the warp threads, or, as many people do, cut the warp threads a bit away from the end of the weaving and use them as part of a tassel-something which many of these pouches had. The other end has the warp waste from where you attached the warp to the loom. I cut mine off roughly where the cards are in this picture.

I added some red thread to the tassel to make them more full, and to match the drawstrings which I'd previously woven.
Carefully cut or poke holes in the top of the pouch for the drawstrings. Make them small; you can always enlarge them if they're not big enough. You need to make an even number of holes (and space them better than I did!).
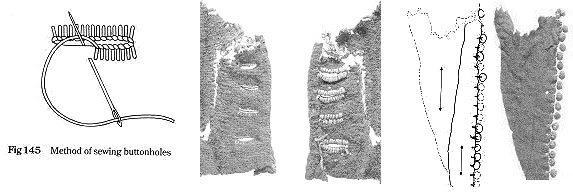
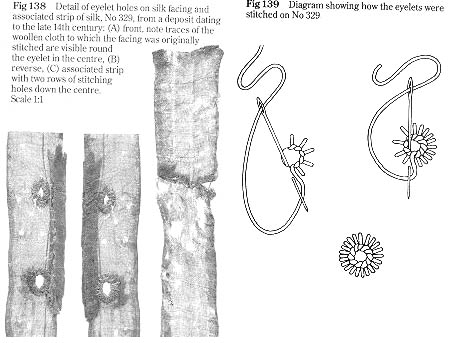
If your pouch is cloth, you'll need to sew the edges of the holes. See here for slits, or here for eyelets for suggestions on sewing the drawstring holes.

While a single drawstring can be used, two strings pulled to opposite sides is much easier to deal with. My strings are kind of short because the original drawstring I made was not really long enough to make into two, but I was out of time to make a second. :(

My drawstrings. 5-loop fingerloop-braid. A simple round braid in three colours, the same blue and green as used for the tablet weaving, and red of the same thread.

Et voilà!
And many thanks to Tenzing (orange), Persephone (black), Jack (also black), and Lancelot (*also* also black), for their diligent snoopervision of this project! And to the Polar Bear for inventing and making the Loom of Awesomeness!
No comments:
Post a Comment